0%

This time, I try to install bettercap docker image on raspberry Pi3B+.

Install dependency package first

1
2
3
4
5
6
7
8
9
10
11
12
13
14
15
16
17
18
19
20
21
22
23
24
25
26
27
28
29
30
31
32
33
34
35
36
37
38
root@treehouses:~# apt install libnetfilter-queue1
Reading package lists... Done
Building dependency tree
Reading state information... Done
The following package was automatically installed and is no longer required:
point-rpi
Use 'apt autoremove' to remove it.
The following NEW packages will be installed:
libnetfilter-queue1
0 upgraded, 1 newly installed, 0 to remove and 1 not upgraded.
Need to get 10.7 kB of archives.
After this operation, 36.9 kB of additional disk space will be used.
Get:1 http://mirrors.ocf.berkeley.edu/raspbian/raspbian buster/main armhf libnetfilter-queue1 armhf 1.0.3-1 [10.7 kB]
Fetched 10.7 kB in 1s (12.1 kB/s)
Selecting previously unselected package libnetfilter-queue1.
(Reading database ... 154638 files and directories currently installed.)
Preparing to unpack .../libnetfilter-queue1_1.0.3-1_armhf.deb ...
Unpacking libnetfilter-queue1 (1.0.3-1) ...
Setting up libnetfilter-queue1 (1.0.3-1) ...
Processing triggers for libc-bin (2.28-10+rpi1) ...
root@treehouses:~# apt show libnetfilter-queue1

Package: libnetfilter-queue1
Version: 1.0.3-1
Priority: optional
Section: libs
Source: libnetfilter-queue
Maintainer: Debian Netfilter Packaging Team <pkg-netfilter-team@lists.alioth.debian.org>
Installed-Size: 36.9 kB
Depends: libc6 (>= 2.4), libmnl0 (>= 1.0.3-4~), libnfnetlink0
Homepage: http://www.netfilter.org/projects/libnetfilter_queue/
Download-Size: 10.7 kB
APT-Manual-Installed: yes
APT-Sources: http://raspbian.raspberrypi.org/raspbian buster/main armhf Packages
Description: Netfilter netlink-queue library
libnetfilter_queue is a userspace library providing an API to packets
that have been queued by the kernel packet filter. It is part of a
system that deprecates the old ip_queue / libipq mechanism.

Install bettercap docker image

1
2
3
4
5
6
7
8
9
10
11
12
13
14
root@treehouses:~# docker pull bettercap/bettercap
Using default tag: latest
latest: Pulling from bettercap/bettercap
bdf0201b3a05: Pull complete
1465d5cbc6a8: Pull complete
59da5739fafc: Pull complete
86a51d61314d: Pull complete
544433dabf48: Pull complete
Digest: sha256:c7497e0839238a0a0d4920e583e765d7b53f794dea70f85882baa42c06ad8cbd
Status: Downloaded newer image for bettercap/bettercap:latest
docker.io/bettercap/bettercap:latest
root@treehouses:~# docker image ls
REPOSITORY TAG IMAGE ID CREATED SIZE
bettercap/bettercap latest c921a193dd94 6 months ago 51.1MB
Read more »

what is Pwnagotchi

Pwnagotchi is an A2C-based “AI” powered by bettercap that learns from its surrounding WiFi environment in order to maximize the crackable WPA key material it captures (either through passive sniffing or by performing deauthentication and association attacks). This material is collected on disk as PCAP files containing any form of crackable handshake supported by hashcat, including full and half WPA handshakes as well as PMKIDs.

falshing an image

download the the latest image
then unzip it into present directory

1
anna@ubuntu1804:~/Downloads$ dd if=pwnagotchi-raspbian-lite-v1.3.0.img of=/dev/sdcard

config file

before boot this image on RPI 3B+, I need to config it first. I mount this device to /mnt/1.
then add config.yml to it.

1
2
3
4
5
6
7
8
9
10
main:
name: 'pwnagotchi'
whitelist:
- 'YourHomeNetworkMaybe'
plugins:
grid:
enabled: true
report: true
exclude:
- 'YourHomeNetworkMaybe'

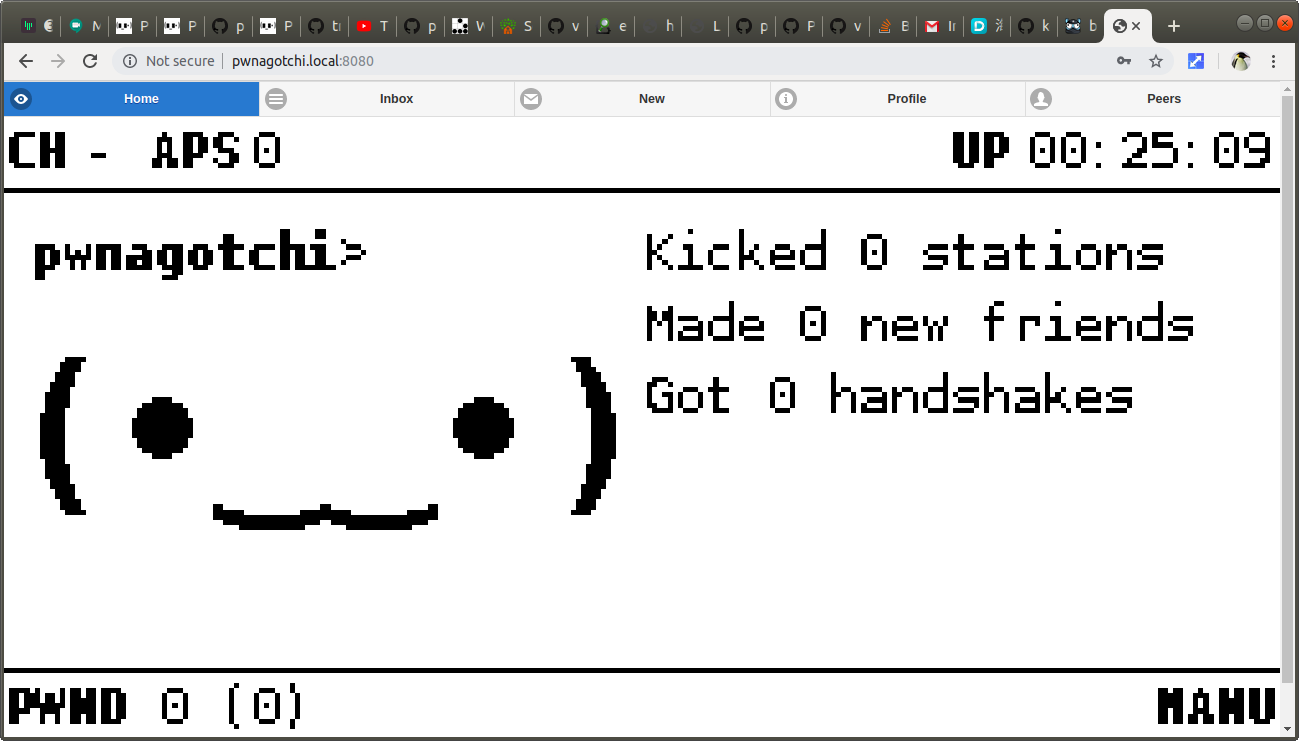
Because I dont have RPi 0w, so I try to use web UI (instead of an e-ink display attached to RPi0W) to see your Pwnagotchi’s face.

I add these to my config.yml file

1
2
3
4
ui:
web:
username: my_new_username
password: my_new_password

In order to reduce power requirements I can lower cpu frequency (underclocking). Edit my /boot/config.txt and uncomment the arm_freq=800.

First boot

It shows like following.

1
2
3
4
5
6
7
8
9
10
11
12
13
14
15
16
17
18
19
20
21
22
23
24
25
26
27
28
29
30
31
Linux pwnagotchi 4.19.81-Re4son-v7+ #1 SMP Wed Nov 6 10:16:47 AEDT 2019 armv7l
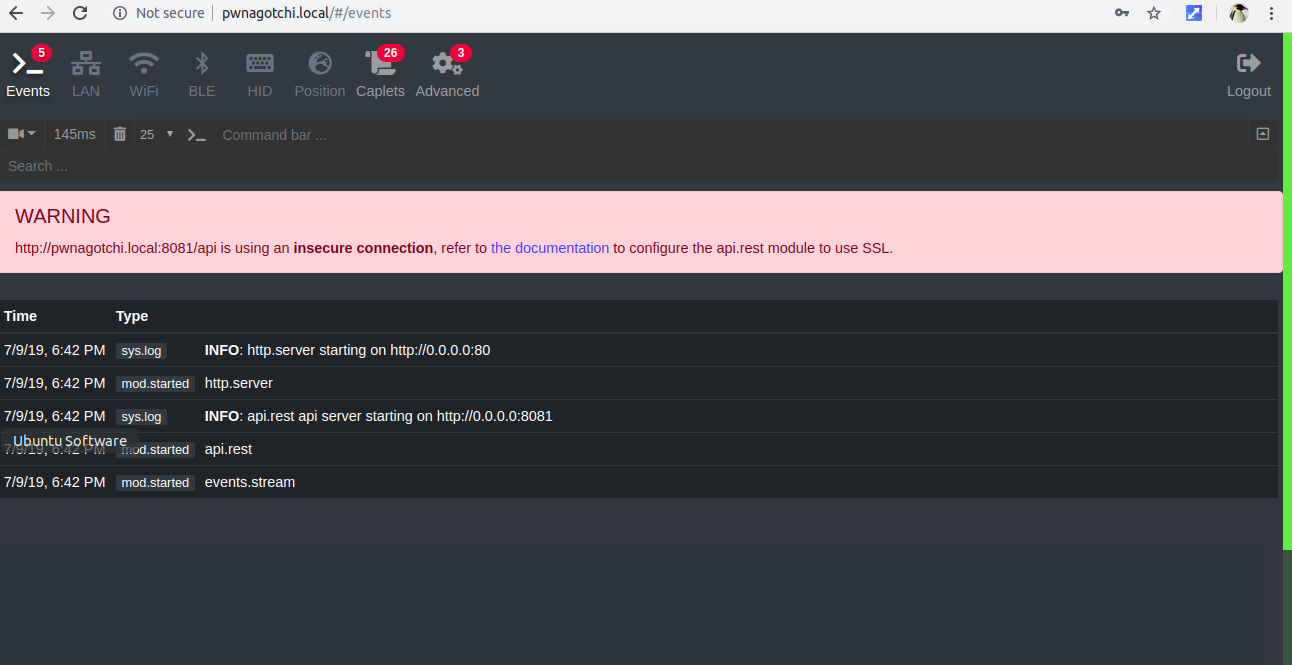
(◕‿‿◕) pwnagotchi

Hi! I'm a pwnagotchi, please take good care of me!
Here are some basic things you need to know to raise me properly!

If you want to change my configuration, use /etc/pwnagotchi/config.yml

All the configuration options can be found on /etc/pwnagotchi/default.yml,
but don't change this file because I will recreate it every time I'm restarted!

I'm managed by systemd. Here are some basic commands.

If you want to know what I'm doing, you can check my logs with the command
journalctl -fu pwnagotchi

If you want to know if I'm running, you can use
systemctl status pwnagotchi

You can restart me using
systemctl restart pwnagotchi

But be aware I will go into MANUAL mode when restarted!
You can put me back into AUTO mode using
touch /root/.pwnagotchi-auto && systemctl restart pwnagotchi

You learn more about me at https://pwnagotchi.ai/
Last login: Wed Jul 10 01:30:38 2019 from 192.168.0.26

SSH is enabled and the default password for the 'pi' user has not been changed.
This is a security risk - please login as the 'pi' user and type 'passwd' to set a new password.

check the service

1
2
3
4
5
6
7
8
9
10
11
12
13
14
15
16
17
18
19
20
21
22
23

pi@pwnagotchi:~ $ systemctl status pwnagotchi.service
● pwnagotchi.service - pwnagotchi Deep Reinforcement Learning instrumenting bettercap for WiFI pwning.
Loaded: loaded (/etc/systemd/system/pwnagotchi.service; enabled; vendor preset: enabled)
Active: active (running) since Wed 2019-07-10 02:17:04 BST; 2min 45s ago
Docs: https://pwnagotchi.ai
Main PID: 406 (bash)
Tasks: 24 (limit: 2319)
CGroup: /system.slice/pwnagotchi.service
├─406 bash /usr/bin/pwnagotchi-launcher
├─468 /usr/bin/python3 /usr/local/bin/pwnagotchi
└─811 orted --hnp --set-sid --report-uri 14 --singleton-died-pipe 15 -mca state_novm_select 1 -mca ess hnp -mca pmix ^s1,s2,cray,is

Jul 10 02:18:06 pwnagotchi pwnagotchi-launcher[406]: Instructions for updating:
Jul 10 02:18:06 pwnagotchi pwnagotchi-launcher[406]: Please use `layer.__call__` method instead.
Jul 10 02:18:06 pwnagotchi pwnagotchi-launcher[406]: [2019-07-10 02:18:06,735] [WARNING] From /usr/local/lib/python3.7/dist-packages/tensorflo
Jul 10 02:19:33 pwnagotchi pwnagotchi-launcher[406]: [2019-07-10 02:19:33,331] [WARNING] From /usr/local/lib/python3.7/dist-packages/stable_ba
Jul 10 02:19:36 pwnagotchi pwnagotchi-launcher[406]: [2019-07-10 02:19:36,093] [ERROR] got data on channel 149, we can store 140 channels
Jul 10 02:19:36 pwnagotchi pwnagotchi-launcher[406]: [2019-07-10 02:19:36,112] [ERROR] got data on channel 149, we can store 140 channels
Jul 10 02:19:36 pwnagotchi pwnagotchi-launcher[406]: [2019-07-10 02:19:36,116] [ERROR] got data on channel 149, we can store 140 channels
Jul 10 02:19:36 pwnagotchi pwnagotchi-launcher[406]: [2019-07-10 02:19:36,118] [ERROR] got data on channel 149, we can store 140 channels
Jul 10 02:19:36 pwnagotchi pwnagotchi-launcher[406]: [2019-07-10 02:19:36,129] [ERROR] got data on channel 149, we can store 140 channels
Jul 10 02:19:41 pwnagotchi pwnagotchi-launcher[406]: [2019-07-10 02:19:41,825] [INFO] sending association frame to clarkwifi (b0:2a:43:e6:6f:f

all the handshake eaten by pwnagotchi can be found under /root/handshake

1
2
3
4
5
6
7
8
9
10
11
12
13
root@pwnagotchi:~/handshakes# ls -al
total 52
drwxr-xr-x 2 root root 4096 Jul 10 02:28 .
drwx------ 9 root root 4096 Jul 10 02:17 ..
-rw-r--r-- 1 root root 1780 Jul 10 02:28 abfguest_d66e0e3131a4.pcap
-rw-r--r-- 1 root root 4824 Jul 10 02:20 ATTtpcaygs_f82dc0d869e0.pcap
-rw-r--r-- 1 root root 6264 Jul 10 02:21 ATTvmtPDGs_2c9569519550.pcap
-rw-r--r-- 1 root root 2544 Jul 10 02:22 DIRECT19HPOfficeJet3830_10e7c694ba1a.pcap
-rw-r--r-- 1 root root 1892 Jul 10 02:25 Hailey716_b02a43ec8ab0.pcap
-rw-r--r-- 1 root root 2812 Jul 10 02:23 hidden_963badcbb2be.pcap
-rw-r--r-- 1 root root 2476 Jul 10 02:23 NETGEARORBIhidden86_963badcbb2be.pcap
-rw-r--r-- 1 root root 2283 Jul 10 02:27 ngHub319444NG01912_dcef09d5a816.pcap
-rw-r--r-- 1 root root 2484 Jul 10 02:21 PeakyBlinders24G_9c3dcf98b8b3.pcap

config the npm file.

This project uses npm config for configuration. I need to create config/local.json5 file to override the configuration as necessary, especially to define githubTokens. After working a lot, I found I need to clone the npm-analyzer repo actuallya. I do not know whether the work before is worthable if I already clone the whole repo.

clone the github npm-analyzer

under my npm_analyzer dirctory, clone the repo to my local machine.

1
git clone https://github.com/npms-io/npms-analyzer.git

copy the default.json file to create my own local.json5 file

1
$ cp default.json local.json5
1
2
3
4
5
6
7
8
vagrant@cli:~/npm_analyzer/npms-analyzer/config$ ls -al
total 24
drwxr-xr-x 4 vagrant vagrant 4096 Nov 7 07:19 .
drwxr-xr-x 9 vagrant vagrant 4096 Nov 7 05:38 ..
drwxr-xr-x 2 vagrant vagrant 4096 Nov 7 05:31 couchdb
-rw-r--r-- 1 vagrant vagrant 1187 Nov 7 05:31 default.json5
drwxr-xr-x 2 vagrant vagrant 4096 Nov 7 05:31 elasticsearch
-rw-r--r-- 1 vagrant vagrant 116 Nov 7 05:47 local.json5

create my githubtoken, write it to local.json5 file

1
2
3
4
{
// Github tokens to be used by token-dealer
githubTokens: ['227dc6ab8270d13f5ac2134c466'],
}

check default.json file

1
2
3
4
5
6
7
8
9
10
11
12
13
14
15
16
17
18
19
20
21
22
23
24
25
26
27
28
29
30
31
32
33
34
35
{
// Databases & similar stuff
couchdbNpm: {
url: 'http://admin:admin@127.0.0.1:5984/npm',
requestDefaults: { timeout: 15000 },
},
couchdbNpms: {
url: 'http://admin:admin@127.0.0.1:5984/npms',
requestDefaults: { timeout: 15000 },
},
elasticsearch: {
host: 'http://127.0.0.1:9200',
requestTimeout: 15000,
apiVersion: '6.3',
log: null,
},
queue: {
name: 'npms',
addr: 'amqp://guest:guest@127.0.0.1',
options: { maxPriority: 1 },
},

// List of packages that will be ignored by the CLI consume command (analysis process)
blacklist: {
'hownpm': 'Invalid version: 1.01',
'zachtestproject1': 'Test project that makes registry return 500 internal',
'zachtestproject2': 'Test project that makes registry return 500 internal',
'zachtestproject3': 'Test project that makes registry return 500 internal',
'zachtestproject4': 'Test project that makes registry return 500 internal',
'broken-package-truncated-tar-header': 'Broken tarball',
},

// Github tokens to be used by token-dealer
githubTokens: [],
}

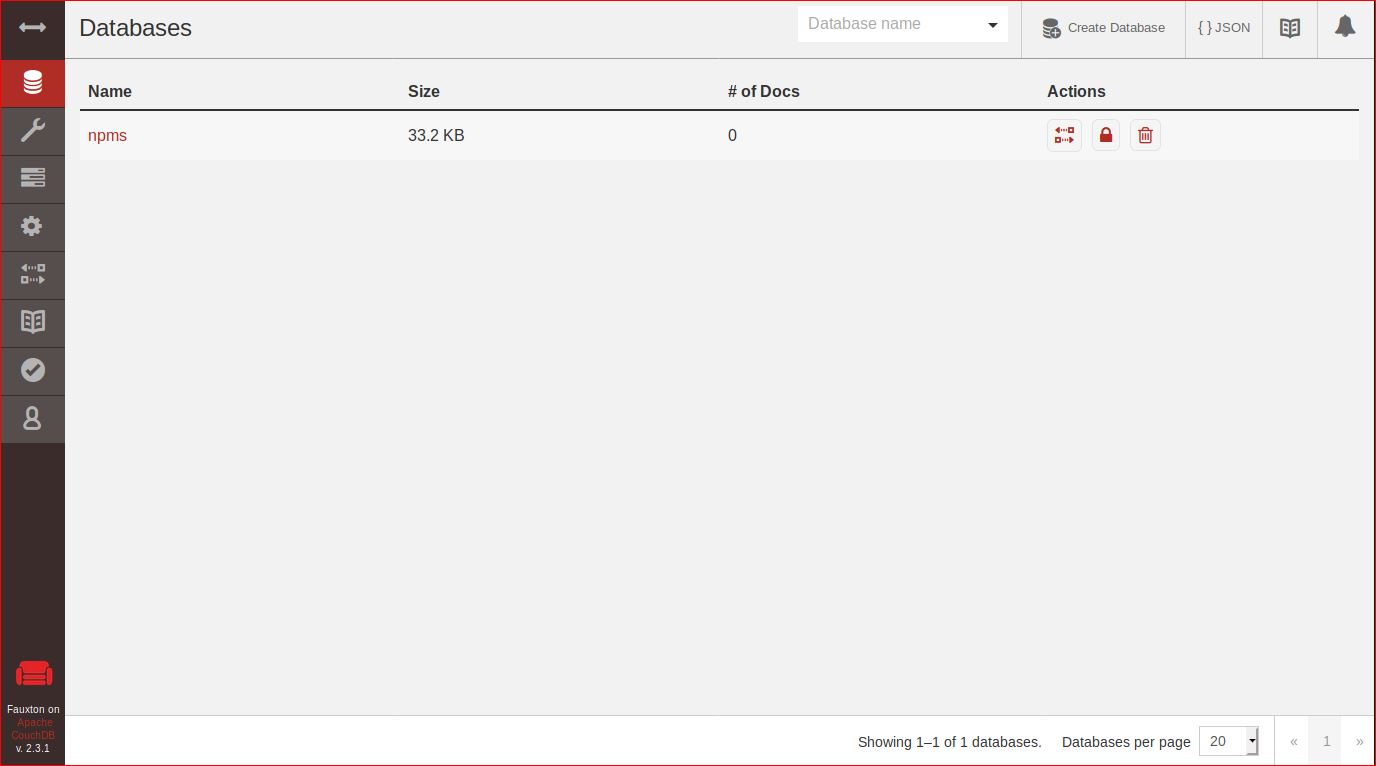
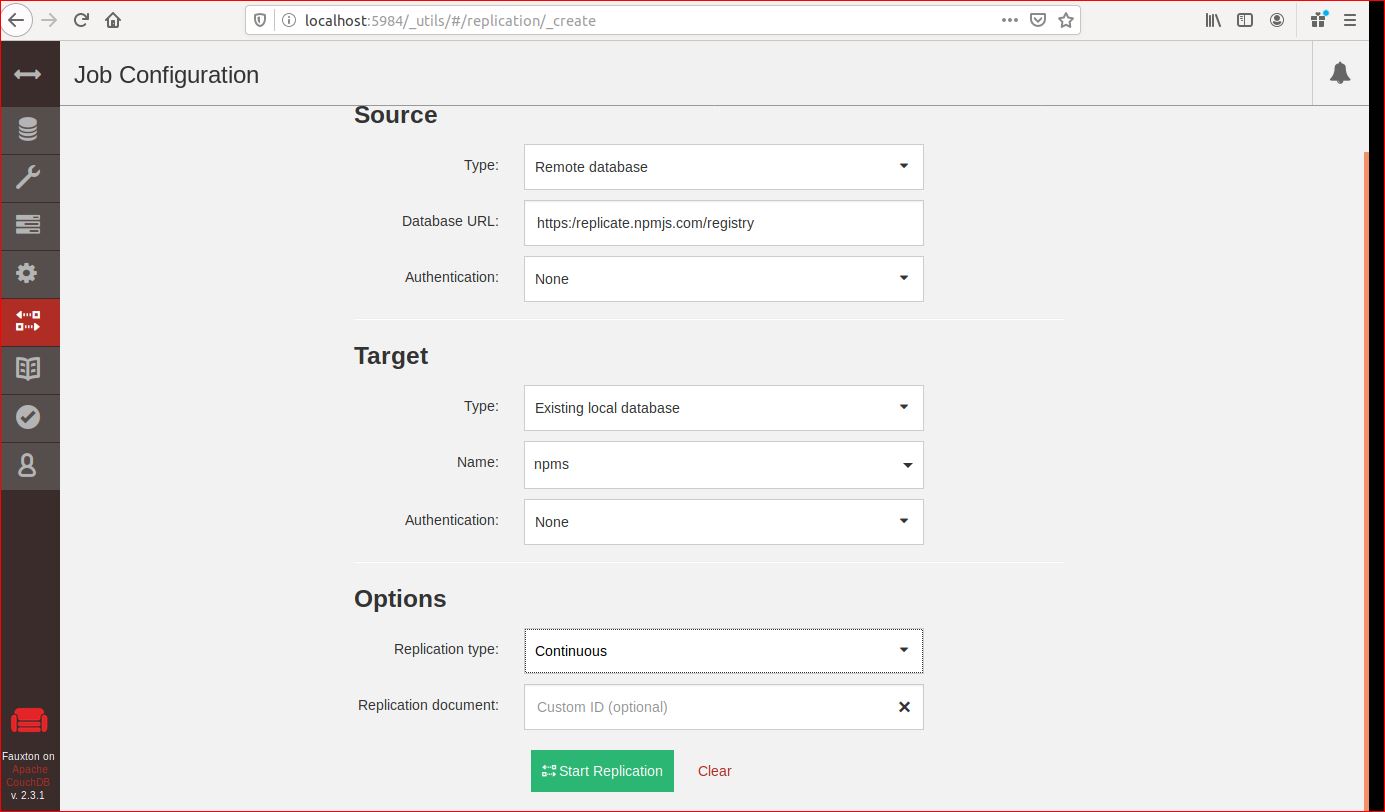
after checking default.json file, I found there are two databases, one is couchdbNpms which is for queue, and another one is couchdbNpm which is for replication from https://replicate.npmjs.com/registry. I only created npms, so I need to go back couchdb to create npm database and redo the replication work. It takes long time to replication the couchdb and also shows “error” for replication funtion on couchdb website.

Read more »

Install elasticsearch

elasticsearch is a scalable and speedy search, analytics, and storage.

import signing key (PGP key)

1
2
vagrant@cli:~/npm_analyzer$ wget -qO - https://artifacts.elastic.co/GPG-KEY-elasticsearch | sudo apt-key add -
OK

install from apt repo

install the apt-transport-https package on Debian before proceeding.

1
2
3
4
5
6
vagrant@cli:~/npm_analyzer$ sudo apt-get install apt-transport-https
Reading package lists... Done
Building dependency tree
Reading state information... Done
apt-transport-https is already the newest version (1.8.2).
0 upgraded, 0 newly installed, 0 to remove and 11 not upgraded.

Save the repository definition to /etc/apt/sources.list.d/elastic-7.x.list

1
2
vagrant@cli:~/npm_analyzer$ echo "deb https://artifacts.elastic.co/packages/7.x/apt stable main" | sudo tee -a /etc/apt/sources.list.d/elastic-7.x.list
deb https://artifacts.elastic.co/packages/7.x/apt stable main

check source list

1
2
3
4
5
6
7
8
vagrant@cli:/etc/apt/sources.list.d$ ls -al
total 24
drwxr-xr-x 2 root root 4096 Nov 6 18:05 .
drwxr-xr-x 7 root root 4096 Nov 6 18:02 ..
-rw-r--r-- 1 root root 419 Nov 2 06:19 bintray.rabbitmq.list
-rw-r--r-- 1 root root 62 Nov 6 18:05 elastic-7.x.list
-rw-r--r-- 1 root root 189 Oct 17 04:04 google-chrome.list
-rw-r--r-- 1 root root 55 Oct 17 04:01 google-chrome.list.save

install the Elasticsearch Debian package

1
2
3
4
5
6
7
8
9
10
11
12
13
14
15
16
17
18
19
20
21
22
23
24
25
26
27
28
29
30
31
32
33
34
35
36
37
38
39
40
41
42
43
44
45
vagrant@cli:~/npm_analyzer$ sudo apt-get update && sudo apt-get install elasticsearch
Get:1 http://security.debian.org/debian-security buster/updates InRelease [39.1 kB]
Hit:2 http://deb.debian.org/debian buster InRelease
Get:3 https://download.docker.com/linux/debian buster InRelease [44.4 kB]
Get:4 https://artifacts.elastic.co/packages/7.x/apt stable InRelease [7,124 B]
Ign:5 http://dl.google.com/linux/chrome/deb stable InRelease
Hit:6 https://deb.nodesource.com/node_10.x buster InRelease
Hit:7 http://dl.google.com/linux/chrome/deb stable Release
Ign:8 https://dl.bintray.com/rabbitmq-erlang/debian bionic InRelease
Get:9 http://ftp.de.debian.org/debian buster-backports InRelease [46.7 kB]
Ign:10 https://dl.bintray.com/rabbitmq/debian bionic InRelease
Get:11 https://dl.bintray.com/rabbitmq-erlang/debian bionic Release [12.6 kB]
Get:12 https://dl.bintray.com/rabbitmq/debian bionic Release [74.5 kB]
Get:13 http://security.debian.org/debian-security buster/updates/main Sources [84.1 kB]
Get:14 http://security.debian.org/debian-security buster/updates/main amd64 Packages [112 kB]
Get:15 https://artifacts.elastic.co/packages/7.x/apt stable/main amd64 Packages [21.9 kB]
Get:19 http://ftp.de.debian.org/debian buster-backports/main amd64 Packages.diff/Index [27.8 kB]
Get:20 http://ftp.de.debian.org/debian buster-backports/main amd64 Packages 2019-11-02-1415.02.pdiff [178 B]
Get:21 http://ftp.de.debian.org/debian buster-backports/main amd64 Packages 2019-11-03-0215.42.pdiff [276 B]
Get:22 http://ftp.de.debian.org/debian buster-backports/main amd64 Packages 2019-11-03-0818.43.pdiff [15.7 kB]
Get:23 http://ftp.de.debian.org/debian buster-backports/main amd64 Packages 2019-11-03-2017.32.pdiff [501 B]
Get:24 http://ftp.de.debian.org/debian buster-backports/main amd64 Packages 2019-11-05-1414.24.pdiff [5,640 B]
Get:25 http://ftp.de.debian.org/debian buster-backports/main amd64 Packages 2019-11-06-1414.27.pdiff [237 B]
Fetched 493 kB in 7s (72.2 kB/s)
Reading package lists... Done
Building dependency tree
Reading state information... Done
The following NEW packages will be installed:
elasticsearch
0 upgraded, 1 newly installed, 0 to remove and 11 not upgraded.
Need to get 289 MB of archives.
After this operation, 488 MB of additional disk space will be used.
Get:1 https://artifacts.elastic.co/packages/7.x/apt stable/main amd64 elasticsearch amd64 7.4.2 [289 MB]
Fetched 289 MB in 29s (10.0 MB/s)
Selecting previously unselected package elasticsearch.
(Reading database ... 57026 files and directories currently installed.)
Preparing to unpack .../elasticsearch_7.4.2_amd64.deb ...
Creating elasticsearch group... OK
Creating elasticsearch user... OK
Unpacking elasticsearch (7.4.2) ...
Setting up elasticsearch (7.4.2) ...
Created elasticsearch keystore in /etc/elasticsearch
Processing triggers for systemd (241-7~deb10u1) ...
Read more »

RabbitMQ is the most widely deployed open source message broker.

At first I go to RabbitMQ to download and install it.
I use the shell script to install rabbitMQ

1
2
3
4
5
6
7
8
9
10
11
12
13
14
15
16
17
18
19
20
21
22
23
24
25
26
27
28
29
30
31
32
#!/bin/sh

## If sudo is not available on the system,
## uncomment the line below to install it
# apt-get install -y sudo

sudo apt-get update -y

## Install prerequisites
sudo apt-get install curl gnupg -y

## Install RabbitMQ signing key
curl -fsSL https://github.com/rabbitmq/signing-keys/releases/download/2.0/rabbitmq-release-signing-key.asc | sudo apt-key add -

## Install apt HTTPS transport
sudo apt-get install apt-transport-https

## Add Bintray repositories that provision latest RabbitMQ and Erlang 21.x releases
sudo tee /etc/apt/sources.list.d/bintray.rabbitmq.list <<EOF
## Installs the latest Erlang 21.x release.
## Change component to "erlang" to install the latest version (22.x or later).
## "bionic" as distribution name should work for any later Ubuntu or Debian release.
## See the release to distribution mapping table in RabbitMQ doc guides to learn more.
deb https://dl.bintray.com/rabbitmq-erlang/debian bionic erlang-21.x
deb https://dl.bintray.com/rabbitmq/debian bionic main
EOF

## Update package indices
sudo apt-get update -y

## Install rabbitmq-server and its dependencies
sudo apt-get install rabbitmq-server -y --fix-missing

after run this instll shell script, it doesn’t work. I try docker image.

Install rabbitMQ docker image

according to rabbitMQ, run command

1
$ docker run -d --hostname my-rabbit --name some-rabbit -p 8080:15672 rabbitmq:3-management
Read more »

CouchDB

Apache CouchDB lets you access your data where you need it. The Couch Replication Protocol is implemented in a variety of projects and products that span every imaginable computing environment from globally distributed server-clusters, over mobile phones to web browsers.
Since I am working in treehouses/cli vagrant in which CouchDB docker already installed, I need to run couchDB docker.

1
docker run -d -p 5984:984 --name=vmnet8 treehouses/couchdb:2.3.1

then open localhost:5984 on my browser

It shows couchDB installed

Create a new database named npms

visit localhost:5984/_utils, you can see the new database npms is created

Setup npm replication from https://replicate.npmjs.com/registry to npm database in continuous mode

Read more »

The npms-analyzer analyzes the npm ecosystem, collecting info, evaluating and scoring each package.In this project, I am going to create an experimental enviroment for treehouses cli package.

Set up all the items needed for this project.

Config file

Configure Node.js Applications

1
npm i config

Programs & utilities

node

1
2
vagrant@cli:~/npm_analyzer$ which node
/usr/bin/node

git

1
2
vagrant@cli:~/npm_analyzer$ which git
/usr/bin/git

rm mkdir chmod wc

They are already in Ubuntu.

tar

1
2
vagrant@cli:~/npm_analyzer$ which tar
/usr/bin/tar

pino

1
2
3
4
5
npm install -g pino-prteey
vagrant@cli:~/npm_analyzer$ which pino-pretty
/usr/bin/pino-pretty
vagrant@cli:~/npm_analyzer$ ls -l /usr/bin/pino-pretty
lrwxrwxrwx 1 root root 38 Nov 1 17:25 /usr/bin/pino-pretty -> ../lib/node_modules/pino-pretty/bin.js

to be contiuned

I need to simulate a npm repo to test codes. The following steps are how to create a npm repo.

Create a npm account

Go to npmjs.com, click “join for free”, then create your account. The weird thing is the password needs at least 10 characters!

Create a npm repo on your local terminal

1
mkdir npm_own

Copy github.com/treehouses/cli package.json url to local

Because I want to test the code on github.com/treehouses/cli and don’t want to mess up the current repo, I copy the url to my local

1
wget https://github.com/treehouses/cli/blob/master/package.json

Create your own package.json

I try to create a repo named “flyingsaucer8”.
Using vim to make my own package.json based on treehouses package.json

1
2
3
4
5
6
7
8
9
10
11
12
13
14
15
16
17
18
19
20
21
22
23
24
25
26
27
28
29
30
31
32
33
34
35
36
{
"name": "flyingsaucer8",
"version": "0.0.6",
"description": "flyingsaucer",
"main": "cli.sh",
"bin": {
"flyingsaucer": "cli.sh"
},
"publishConfig": {
"access": "public"
},
"repository": {
"type": "git",
"url": "https://github.com/vmnet8/flyingsaucer.git"
},
"scripts": {
"postinstall": "if [ $(id -u) = 0 ]; then ln -sr _flyingsaucer /etc/bash_completion.d/_flyingsaucer; fi && exit 0",
"postuninstall": "if [ $(id -u) = 0 ]; then rm /etc/bash_completion.d/_flyingsaucer; fi && exit 0",
"test": "echo \"Error: no test specified\" && exit 0"
},
"keywords": [
"flyingsaucer"
],
"author": {
"name": "flyingsaucer team",
"email": "alien@flyingsaucer.io",
"url": "https://flyingsaucer.io"
},
"license": "AGPL-3.0",
"bugs": {
"url": "https://github.com/vmnet8/flyingsaucer/issues",
"email": "alien@flyingsaucer.io"
},
"homepage": "https://github.com/vmnet8/flyingsaucer",
"dependencies": {}
}
Read more »

I keep my resume on github, and is going to update it with my working experience changing.Since resume is written in markdown format on github, I need a PDF format when applying job on line. How to convert markdown file to PDF file easily?

Convert markdown file to html format first

You need to check markdown is already installed or not. If not, you need use apt install markdown to install it.

1
2
anna@ubuntu1804:~$ which markdown
/usr/bin/markdown

Go to directory where your markdown file lies, run

1
anna@ubuntu1804:~/git_repo/resume$ markdown resume.md resume.html

you will convert resume.md markdown file to resume.html

then you can go to webbrowser to see this html file, to make sure it works.

Convert html file to PDF file

To convert PDF file, you need to use wkhtmltopdf tool

1
2
3
apt install wkhtmltopdf
anna@ubuntu1804:~$ which wkhtmltopdf
/usr/bin/wkhtmltopdf

go to the same directory where the resume.md and resume.html lie, run

1
wkhtmltopdf -s letter  -B 25mm -T 25mm -L 25mm -R 25mm resume.html resume.pdf

then you can get the PDF format resume file.

1
2
3
4
anna@ubuntu1804:~/git_repo/resume$ ll
-rw-r--r-- 1 anna anna 4493 Oct 14 22:46 resume.html
-rw-r--r-- 1 anna anna 3728 Oct 14 22:45 resume.md
-rw-r--r-- 1 anna anna 34985 Oct 14 22:46 resume.pdf

Write a script to execute convert automaticly

Read more »

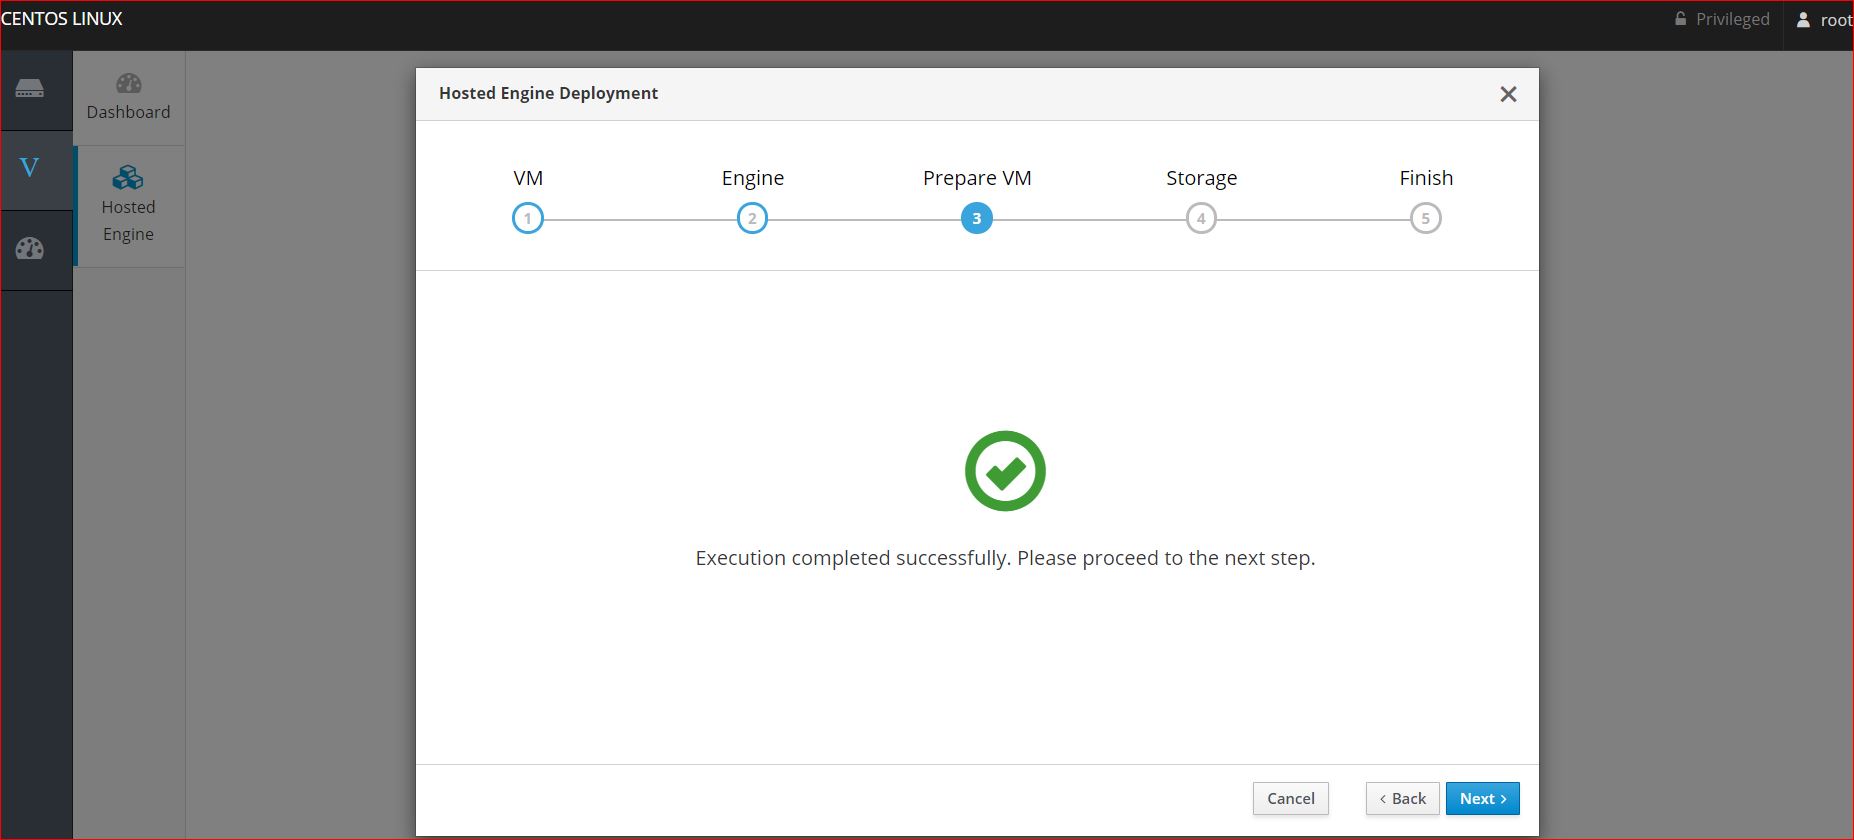
Last time we talked about adding a host to oVirt engine, it looks like following:

configure storage

Setting up storage is a prerequisite for a new data center because a data center cannot be initialized unless storage domains are attached and activated.
A storage domain is a collection of images that have a common storage domain contains complete images of templates and virtual machots), ISO files, and metadata about themselves. A storage domain can be made of either block devices (SAN - iSCSI or FCP) or a file system (NAS - NFS, GlusterFS, or other POSIX compliant file systems).

configure NFS storage

First I use another centOS as a nfs server,then attached it to storage domain.

1
2
3
[root@cube4200 ~]# showmount -e
Export list for cube4200:
/export/hosted_vm 192.168.0.0/24

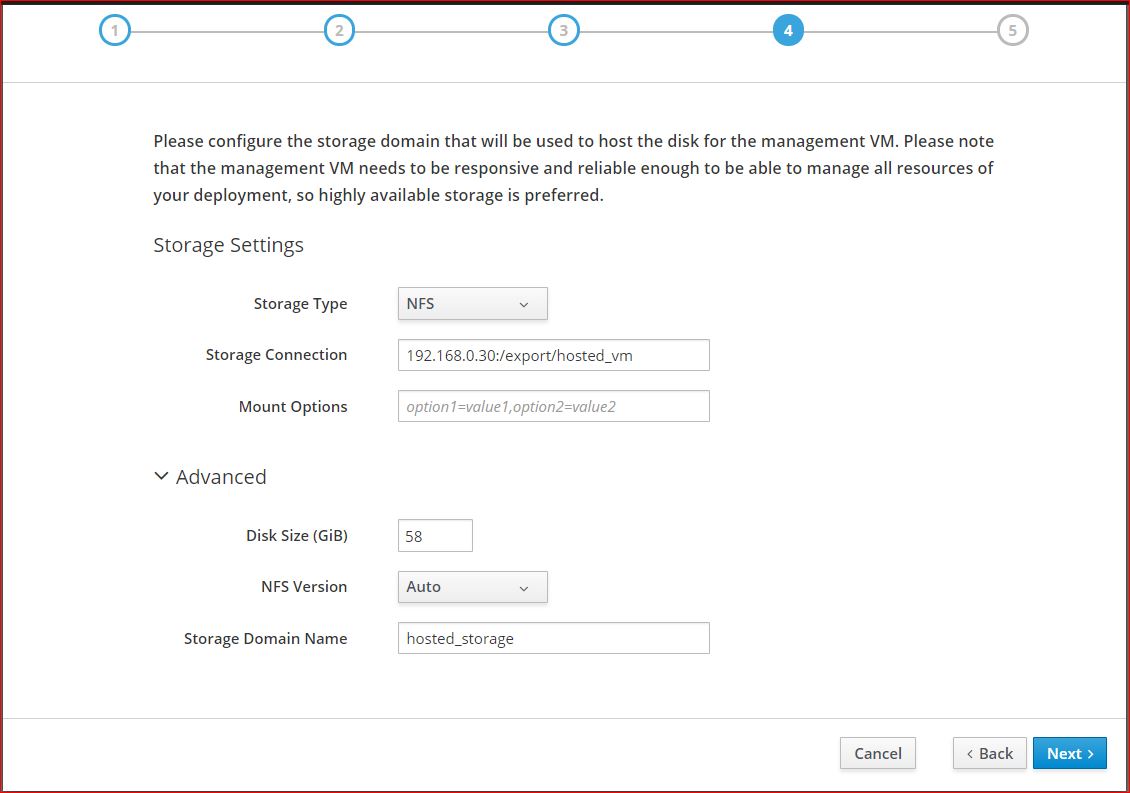
It is attached successfully.

Read more »